
Better Business Insights With QuickBooks Desktop
Hello! I am back with another informative QuickBooks Desktop tutorial. An industry leader in finance software for small to medium-sized businesses, QuickBooks allows you to do anything finance-related.
In my last article, I showed you how to attach and send files, but there is so much more you can do—such as emailing sales forms, invoices, statements, and more—all right within QuickBooks.
Today, I would like to go back to basics and show you how QuickBooks Desktop users can access and retrieve emails sent from QuickBooks.
Insights for the QuickBooks Desktop User
If you have QB Desktop hosted in the cloud, you are technically using QuickBooks Desktop software online. There are several benefits to running QuickBooks Desktop in the cloud, including the ability to automatically back up your information.
Even with this terrific access and functionality, you can hit a bit of a snag with the software.
Tell me if this has happened to you before—you send a customer an invoice and weeks later, they say “I never got it.” Instead of scrolling or searching through all the emails in your work inbox, you can locate the email in QuickBooks Desktop.
To view emails sent from QuickBooks, you will need the email address in question.
You also need to ensure you have your primary or business email integrated with QuickBooks—click here for instructions.
Once this part is complete, proceed with the instructions below.
Sent Emails From QuickBooks can be Promptly Located
A QuickBooks Desktop user should double-check to see if the customer’s email address is written or typed correctly before starting.
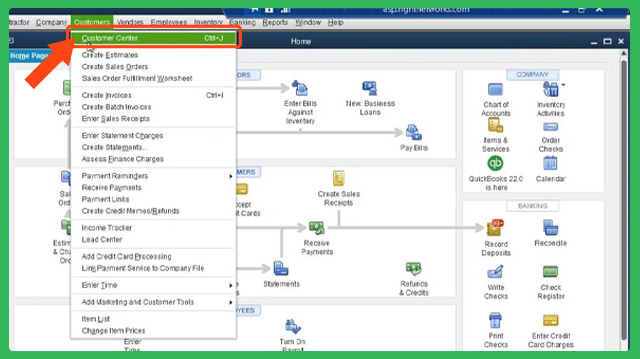
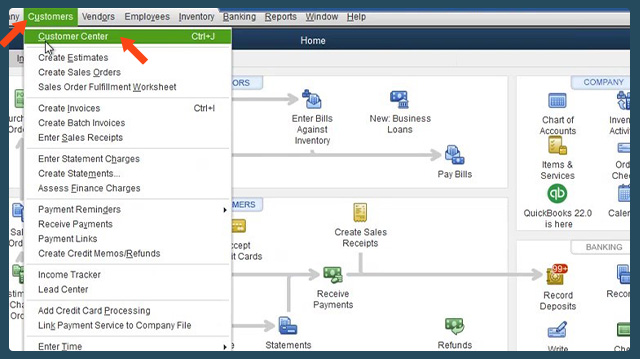
1. Navigate to the Customer Center by pressing Ctrl+J on your keyboard. Alternatively, use the menu options at the top and click Customers, then Customer Center from the drop-down.
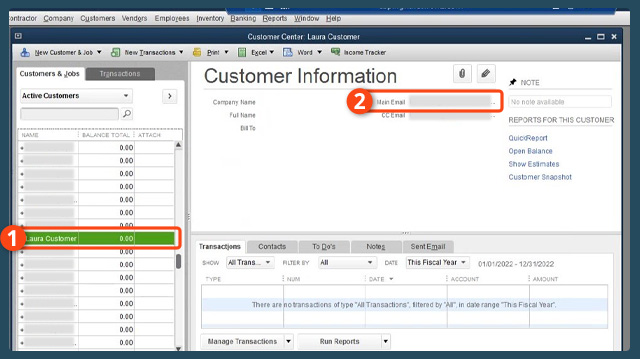
2. Scroll through your list of customers to find the emails sent from QuickBooks or use the search bar to find the customer you’re looking for. ➀ Click on their name to open their profile on the right-hand side.
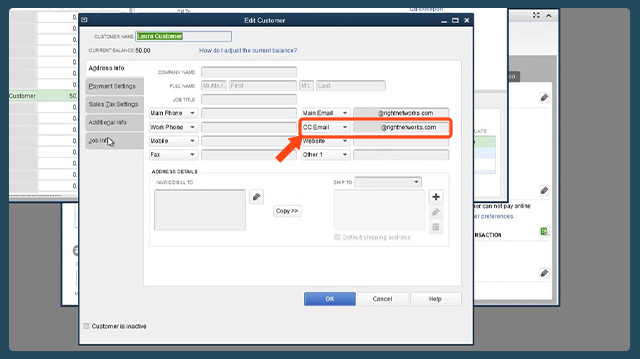
3. In the ➁ Main Email section, verify that the email address for the customers is accurate and formatted correctly.
4. If it looks incorrect, double-click on the customer’s name in the list of customers or click the pencil icon in the upper right corner. This takes you to the Edit window.
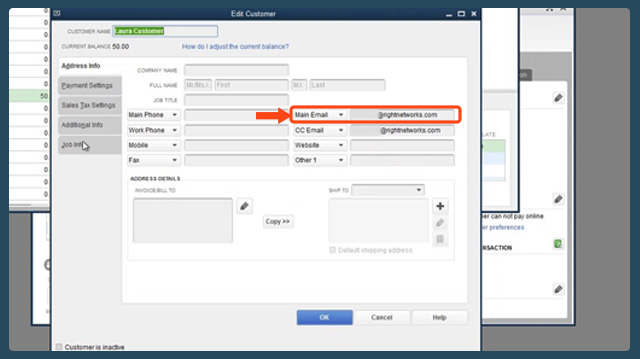
5. Type in the correct email address in the Main Email field and click OK.
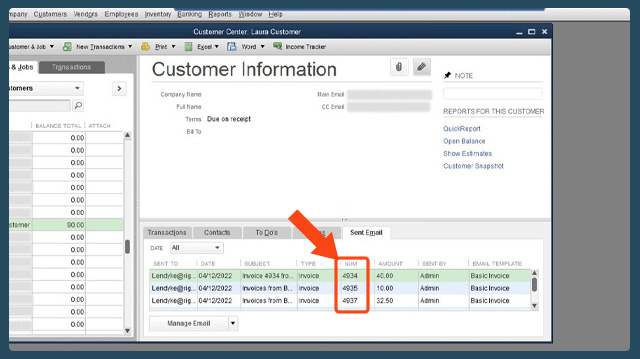
6. Now that you have verified the email address, simply view emails sent from QuickBooks which can be found in the Sent Email tab at the bottom half of the customer profile.
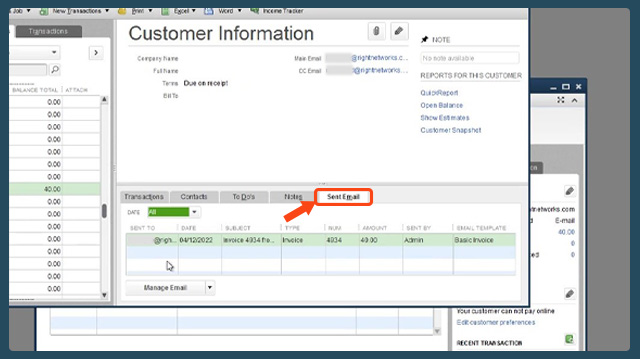
Now, you should be able to see all the emails sent from QuickBooks in a list view.
A Few Other Email Tips for QuickBooks Desktop Users
QuickBooks Desktop was born to give customers access to a bevy of finance tools.
You can also learn QuickBooks quickly and commit many of the simple-to-follow commands to memory with continued use. Further amazing tips, in addition to emails sent from QuickBooks, can be found below:
Tip #1: When looking at the emails sent in the Sent Email tab, if the “Number” field does not have a specific invoice number, that means several invoices were sent as a batch in a single email.
Tip #2: You can BCC yourself on all email communications to receive a copy in your work inbox. This will send a copy of any form you email to you and the other recipient(s).
If you get the copy and the recipient’s email address recorded is correct, then this should indicate emails you sent from QuickBooks were accurately processed.
To set this up, follow the instructions below:
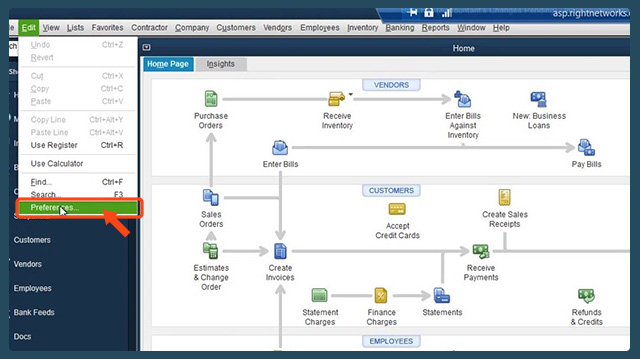
- Click on the Edit menu option near the top left of QuickBooks, then click Preferences from the drop-down.

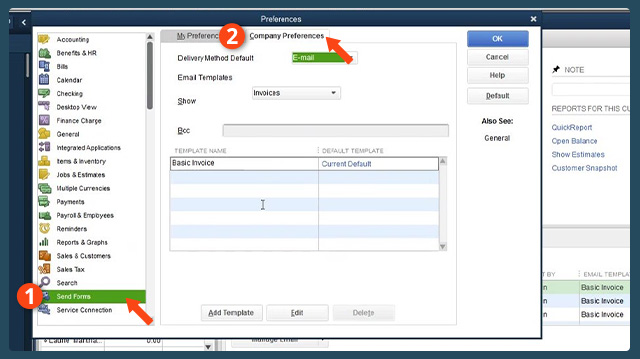
- ➀ Select Send Forms followed by ➁ Company Preferences. Under the “Show” section, select the type of automated email that you would like to be Bcc’d to (Invoices, Sales Orders, Estimates, etc.)

- Type your own email address in the BCC (Blind Carbon Copy) field. Be sure to save all along the way as you work (this is a crucial step for any QuickBooks Desktop user.)
Retrieving sent emails from QuickBooks for certain customers
Now, if you only need to receive copies of emails sent to certain customers, here are a few instructions on that as well:
- Navigate to the Customer Center by pressing Ctrl+J on your keyboard. Alternatively, use the menu options at the top and click Customers, then Customer Center from the drop-down.
- In the Address Info tab, type your email address into the CC Email field. Then, click OK.
Tip #3: QuickBooks allows you to customize email templates to send invoices, sales orders, and more.
This feature lets you add a distinctive touch or more information to every email you send out.
To customize your email templates, follow the instructions below:
- Click on the Edit menu option near the top left of QuickBooks, then click Preferences from the drop-down.
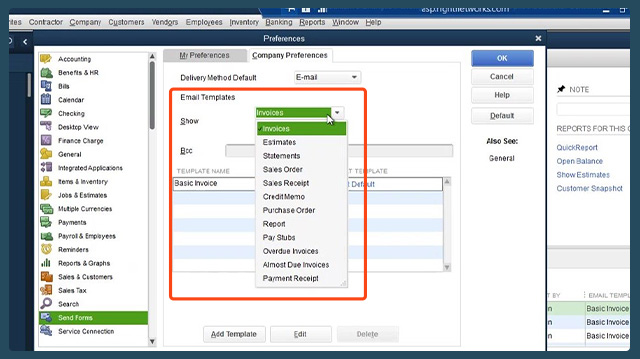
- ➀ Select Send Forms then ➁ Company Preferences.
- Under the Show option, click the drop-down menu to view your templates for invoices, estimates, etc., and click on one of the options to select it.
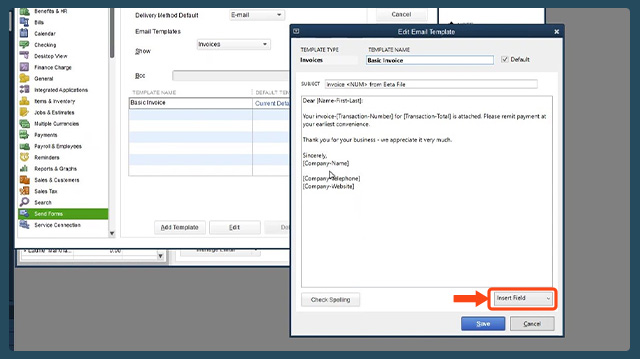
- To modify an existing template, click on it in the Template list, then click Edit. If you would like to make a new template, click Add Template.
Optional QuickBooks Desktop user fields
There are optional fields you can add that will auto-populate with specific information when the email is sent out.
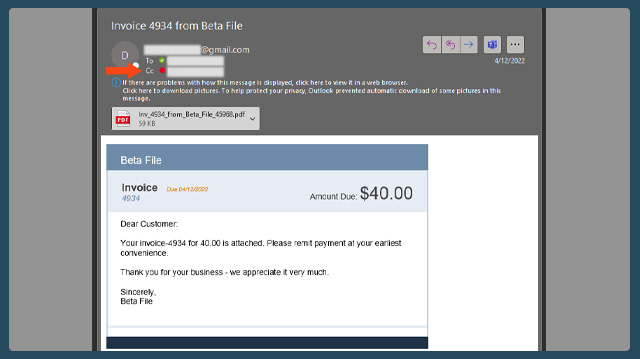
For example, inserting the Invoice Number Field ensures that the exact invoice number will appear in the email template. All the information you need will be there even after the emails you sent from QuickBooks have been processed.
By default, when you save and close something you were working on, such as an invoice, it is marked as “Send Later”.
These items get sent to a queue that will not send out emails until an action is performed to send all emails in the queue. If this queue gets backed up, it can slow down your QuickBooks file.
Continue to Learn QuickBooks
QuickBooks Online and QuickBooks Desktop provide a wide range of comprehensive finance software options that can assist you in your daily accounting adventures.
For this reason, you should set aside time to further learn QuickBooks functionality via a QuickBooks tutorial or two.
That said, I hope this QuickBooks tutorial on how to review emails sent from QuickBooks was of some help to you. If you wish to learn more about how QuickBooks can help improve your accounting firm’s workflow, contact us today!